
Blitzit now supports seamless integration with ClickUp, allowing you to sync your large ClickUp lists with Blitzit and turn them into focused, actionable tasks.
Setting up Integration
Open Blitzit and navigate to the integrations menu.
Select the ClickUp option.

Choose the ClickUp workspace you want to connect.

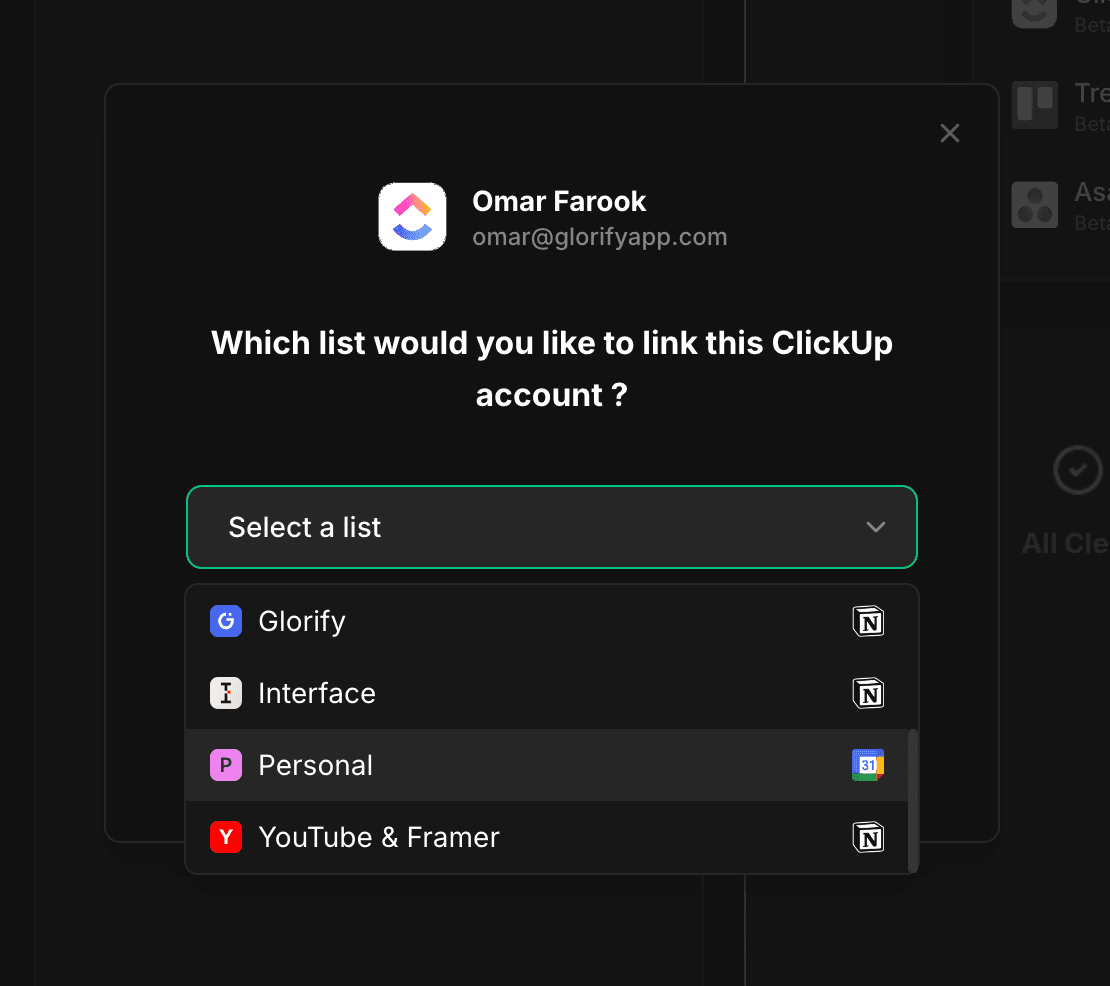
Once connected, select the specific Blitzit list you want to link to your ClickUp Space, then click Link now. This establishes a two-way sync between the apps.
You will see a ClickUp logo on the top right of the linked list, indicating the connection is active (if you don't see it, it's likely you're in the wrong list).
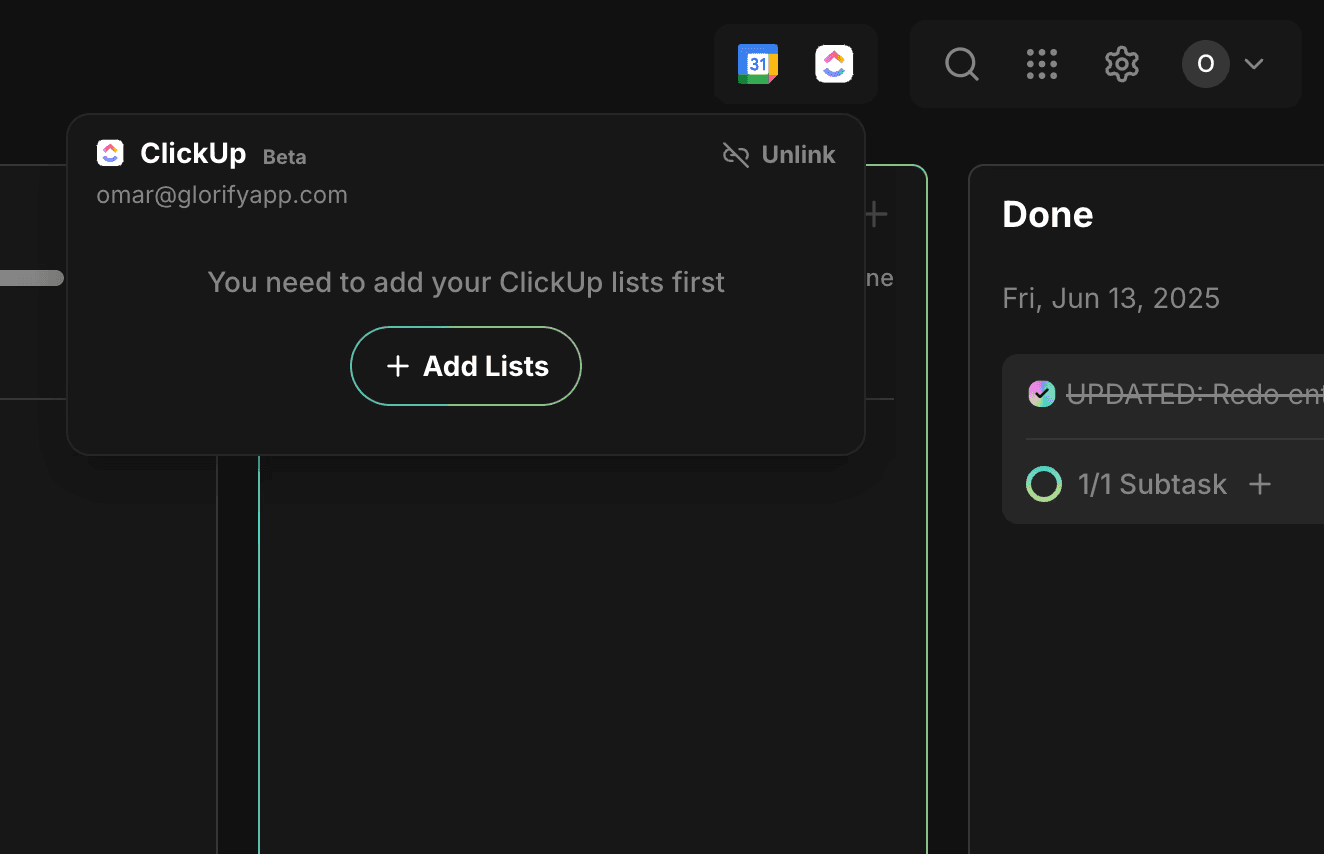
Click this logo and select Add Lists to import your ClickUp lists.

The imported lists retain their original organization and colors from ClickUp. You can choose which spaces, folders, or individual lists to sync, then click Update lists selection.
Next, you’ll see the available tasks from ClickUp, including their statuses. Select the tasks you want to add and click Add selected tasks to list.

Working with synced tasks
Tasks imported from ClickUp display a ClickUp logo. Their placement in Blitzit columns depends on their assigned dates in ClickUp — for example, tasks without dates or due beyond the current week will go to the Backlog, while tasks due this week appear in the This Week column and tasks due today in the Today column.
The following task data syncs between Blitzit and ClickUp:
Titles
Dates
ESTs (Time Estimates)
Subtasks (created from ClickUp to Blitzit. Name and status syncs both ways)
Status (To Do, In Progress, Complete)
Task Options via Expanded Menu
By opening the Expanded menu on a task, you can:
Update the schedule
Open the task directly in ClickUp
Move the task to a different Blitzit list while maintaining sync
Duplicate the task (duplicates have “Copy” added to the title and do not sync back to ClickUp)
Integration Settings
Unlink: Disconnects the integration at any time. Synced tasks remain in Blitzit but will no longer update from ClickUp.
Update Lists: Sync additional ClickUp projects or lists not yet imported.
Refresh: Manually refreshes tasks from ClickUp.
Auto Syncing: Enabled by default, automatically syncing new ClickUp tasks to Blitzit. You can disable this to control syncing manually.
Assignees Mapping: Sync tasks based on selected assignees. You can also choose to sync unassigned tasks.
Sync Delete: When enabled, deleting a task in Blitzit deletes it in ClickUp. Deleting a task in ClickUp only unlinks it from Blitzit, keeping it as a regular task locally.
Status Mapping: Choose whether tasks with statuses in ClickUp’s Not Started, Active or Done groups go to the Backlog column in Blitzit. You can also choose whether tasks with statuses in ClickUp’s Closed group appear in Blitzit’s Done column.
Date Mapping: Decide if Blitzit’s scheduled dates correspond to Start dates or Due dates in ClickUp.
Subtask Settings: Choose whether ClickUp subtasks appear as subtasks in Blitzit or as separate tasks.

Troubleshooting
Working with Shared Spaces in ClickUp: If you’ve been invited to a shared ClickUp workspace, make sure to select that workspace when connecting ClickUp in Blitzit. If you only select your own workspace, shared workspace lists won’t appear or sync. Selecting the correct workspace lets you import and sync lists from shared spaces just like your own.
Subtasks created in Blitzit: Note that subtasks created directly in Blitzit are independent and do not sync back to ClickUp.
Schedule discrepancies: Ensure both Blitzit and ClickUp use the same time zone settings to avoid discrepancies in task scheduling. Blitzit uses your desktop’s time zone, while ClickUp’s time zone can be adjusted in its settings.